Blackadders Scratchbuilt Titan projects..................

  • Serendipity Once Again Rears It's Ugly Head:


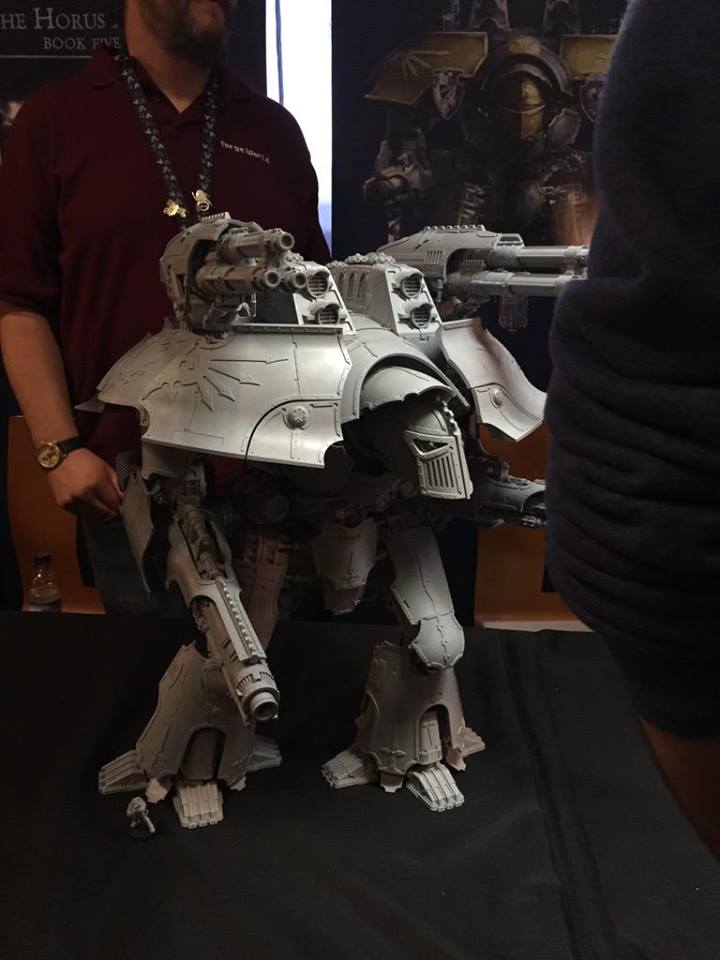
    I was going to keep these to myself until the Warlord was reassembled but this was too good to pass up without comment, the effect would be lost in the overall presentation of the completed model...........


    http://i.imgur.com/yWdZDbM.jpg


    I wish I could take credit for this but it came about purely by accident; I noticed when I was applying the armour veneers that the 'Testors' glue was slightly dissolving the 0,25 MM (0.010 inch) sheet styrene but until highlighting these large panels today I had no idea to what extent. The aluminum powder accentuates the dissolved areas giving a millennia old worn and weathered appearance that probably could not have been achieved on purpose.


    http://i.imgur.com/4JzpGjG.jpg


    The effect was simple to achieve I just took the tube of glue and squeezing ever so slightly applied threadlike trails all over the area to be covered with the pre-cut sheet styrene. I the rubbed the panel until the glue set and sealed the edges with thin set solvent.


    Even the mistakes and warped panels lend character to the armour simulation battle damage or in the case of the prominent vertical line in the first image where I removed a strip of styrene and applied it diagonally for greater aesthetic appeal looks like the residue of a centuries old modification.


    Of course there may be some that do not like this mottled effect but to me this battle weary biped looks the better for the superficial damage.

    "It is easier to deceive people than it is to convince them that they have been deceived."

  • The Command Deck Retrofitted:


    In view of the new colour scheme the Command deck needed to be brought into accord so the new Command is now complete and ready for furniture and shutters.


    http://i.imgur.com/YoZz7nG.jpg


    The big gaping hole is for the lighting module that will light both the Command and Engineering decks.


    Much of the interior is chopped up bitz from a CoD kit with a few home made items such as the blast doors and the front wall panel.


    http://i.imgur.com/I9PdmFV.jpg


    I think the steely interior is more in keeping with the 40K genera but the English signs may be a bit out of place. I can't recall warning signs in my search for Warhammer items.


    Anyway the Vestibule of the "Door to Nowhere" now has a pocket door


    http://i.imgur.com/yJTZbZc.jpg


    I definitely need a light in the vestibule to show the detail.


    http://i.imgur.com/Jkmq31w.jpg


    But for now a flash will do.


    http://i.imgur.com/5vCizqY.jpg


    I really love weekends, I get so much done..............

    "It is easier to deceive people than it is to convince them that they have been deceived."

  • Update on the powdered metal, in my travels today I tried a local artist supply store where I found "Pearl Ex Pigments"


    These are true metallic pigments and I purchased "Aztec Gold", "True Blue" and "Silver" which is actually a grey pigment that I intend to mix with the 'True Blue' to make a 'Steel' colour.


    Someone might check for Aussie art stores that may stock similar materials.


    Here is a link to a US store for reference and colour chart. Note on the colour chart; it shows the colour but doesn't represent the metallic sheen if the actual pigment.


    http://www.dickblick.com/products/jacquard...rl-ex-pigments/


    Since this stuff is manufactured in California, the Super Nanny State, it should be safe enough to feed your Joey as the label says NON-TOXIC.

    "It is easier to deceive people than it is to convince them that they have been deceived."

  • Gee Blackadder You Sure Have a Lot of Pencils:


    Taking a side trip to make the searchlight lenses and mount the lights on the flying greaves.


    First order of business was to remove the opaque lenses from the GW searchlight frame, that was accomplished with various drills and my drum rasp.


    http://i.imgur.com/2P5zkWA.jpg


    The flying greave imaged here has the searchlight housing installed and awaiting the LED. What this country needs is a good right angle LED because end on it just won't fit.


    A complaint Ms Blackadder has voiced on occasion..... but I digress.


    Below the various stages of cutting out the lenses and a finished lens ready for install in the frame and a completed frame and lens that has to be redone as it was my first try and I made the lens too small.


    http://i.imgur.com/mtvspuc.jpg


    No 'wag' comments please.....


    Finally same shot different angle showing a drum rasp in the foreground; an indispensable tool for reshaping styrene.


    http://i.imgur.com/qSl3JaJ.jpg

    "It is easier to deceive people than it is to convince them that they have been deceived."

  • Much Ado About Nothing:


    Well it took a lot of effort and modifications but I finally got my searchlights operating and I have to say I'm not overwhelmed. cutting the lenses checking the circuit as it was being assembled was a lot of trouble for this less than awesome result..........

    http://i.imgur.com/DuutMk5.jpg


    After clearing the top lens I think I'll cloud it up again because the translucent lenses look better.


    http://i.imgur.com/kCpr4pF.jpg


    The reverse side shows the temporary splices to prove the circuit. I have to clean and solder the connections.


    http://i.imgur.com/z8IOlNa.jpg


    What next Blackadder; a Bat Signal?

    "It is easier to deceive people than it is to convince them that they have been deceived."

  • Thanks for the replies although "Remote Control" is not in my future...............I do have some features yet to install.


    I kept putting off the installation of the lights hoping that technology will eventually catch up to my requirements alas to no avail. The standard LEDs have a cylindrical shape, the length being about twice the diameter, with a 'built in' lens at one end that for some reason has to be moulded 'straight on' as opposed to the 90° configuration I required. This seems to be industry standard unless I want to buy special kits/models/and bling lighting (which incidentally has higher voltage requirements than I can comfortably house in the confines available) that may have my requirements and even then the LEDs are pretty much dedicated to the specific item.


    What I did in this case was to line the interior of the searchlight housing with aluminum foil to reflect the beam back into the housing and then out through the lens which is sufficient. I just needed the resultant effect of the searchlight illuminated, it did not have to literally throw a beam.


    By mounting the LED 'end on' through the lens would have created a "Hot Spot'' of light instead of diffusing through the entire lens aperture plus I would have had unsightly wires protruding from the back end of the searchlight housing instead of virtually hidden protruding from the side. In all the installation was a sufficient compromise and I achieved the effect I desired albeit not without a good deal of wiring gymnastics.... More on the installation to come now that I have come up with a viable plan of execution to follow.


    Now that I have a plan I can proceed with the rest of the illumination. Headlights on the face seem to me superfluous but I do like the idea of red carapace 'running lights' à la the Inquisitor Warlord:


    http://www.pcdome.hu/gallery/3977/image11.jpg


    Of course interior lighting is definitely in the works "Head and Torso" will be well illuminated........


    Thanks for the reply.

    "It is easier to deceive people than it is to convince them that they have been deceived."

  • Plan Ahead:


    Well I thought I planned ahead but NOT!


    It seems my ambition has exceeded my complacency so I had to cut into finished work to upgrade the overall interior appearance. I had been contented to just have un-embellished lights somewhere in the command deck overhead but now I want side mounted recessed lighting in the upper gallery that looks like it belongs.


    With that it necessitates cutting into the floor of the Void Generator compartment which will serve also for me to install reflective panels in the command deck ceiling.


    http://i.imgur.com/ArNpL2g.jpg


    These three images of just about the same thing shows one LED (temporarily installed and the rough cut openings I made for access to the hidden compartments behind the room walls that will now be the battery/electrical compartments. The cuts will be dressed smooth and the ceiling panel will now be removable for access to the batteries and wiring The white styrene stripes are newly installed reinforcements for the walls.


    Closeup of the LED with spacer collar and bezel trim:


    http://i.imgur.com/vmyV6iz.jpg


    Another view of the same..........


    http://i.imgur.com/LntpyZf.jpg

    "It is easier to deceive people than it is to convince them that they have been deceived."

  • Together Again:


    The leg/waist component is back together again with new lighting, new bolts and nut axles, new escape hatch and detail on the underside of the pelvis and a new covering of graphite hued skin which will have to be brightened with some beauty marks.


    http://i.imgur.com/nQHirKF.jpg


    But in fairness the room is quite dark and the flash somehow augments the darkness.


    The electronics are moving ahead quite well and the interior lighting should be finished this coming weekend.


    On the upper torso the new Engineering 'Blast Door' is completed and installed and the gunner platform behind the chest plate is ready but not as yet installed (It will be a removable piece consisting of two gunners and bolters firing down at enemy ground personnel.


    http://i.imgur.com/ppBoM9j.jpg


    Big surprise in this image the greave floodlights seem to be working, they are actually reflecting the flash.

    "It is easier to deceive people than it is to convince them that they have been deceived."

  • Together Again, Again:


    This time with the upper torso reassembled. I haven't seen this this complete until today when it's been completely assembled (aside from a few glitches such as the new beefier gun stanchions interfere with the catwalks and the interior of the main guns barrels need to be painted. I started highlighting basic shiny armour with metallic gold and copper dry pigments but only on the interior. The effect needs a little refining before pictures.


    http://i.imgur.com/EO1R8nx.jpg


    The exterior needs some lighter silvery highlights and quite a few splashes of colour I know but right now I am overly pleased with the effect so far.


    http://i.imgur.com/kFFEZGs.jpg


    These low angle shots really show the majesty of this titan much more so than straight on and high level images especially without pieces that demonstrate the scale of the beast.


    http://i.imgur.com/VcUaPke.jpg


    I have to install locking washers on the axles because the upper torso has become so heavy the bolts loosen just standing static and Luteus almost took a header off the telly console and I caught it just in time before it crashed to the floor.


    http://i.imgur.com/9E1d6i9.jpg


    Note in the view above the engineering upper gallery faceted rectangular view ports, I may highlight those with copper bands so the glue seams don't show.


    http://i.imgur.com/k8ErOjW.jpg


    Finally what every grunt longs for; that a Warlord has passed him by and he can still lives to tell about it.


    In all not a bad week's effort...........I may celebrate tonight with a Martini.

    "It is easier to deceive people than it is to convince them that they have been deceived."

  • Is there a Mars pattern Warlord in your future?


    Seems the buzz is that FW will be releasing a Mars Warlord in the first half of this year according to:


    http://battlebunnies.blogspot.…7110#c3746920820961701592


    unless this is the cruelest April fools joke imaginable. Now why they were keeping this a secret is beyond comprehension because unless you're independently wealth you're going to have to save up to buy one of these because the projected price will be around £914 (1351.86 US Dollars); hope that includes weapons.


    The good news is it appears 1.5 to 2.0 times taller than the Reaver Titan judging by the main gun showing
    in the Reaver image:


    so my Lucius Warlord is in the same ball park:


    http://i.imgur.com/kFFEZGs.jpg


    plus it's a Mars so there's no conflict there......... Whew!

    "It is easier to deceive people than it is to convince them that they have been deceived."

  • Something Unholy Comes This Way:


    A tease in the FW newsletter; the foot pad of the Mars Warlord. and a scale figure so I can do a bit of calculating.


    To my eye it seems a bit smaller than my 'Luteus' but that might just be my paranoia.


    Anyway there is significant changes in detail from the Epic Warlord cast metal titan I based my model on so I shall have to see if any amendments can be made to 'Luteus Vexant' I believe what is presented here are the diagonal trapezoidal toes. which are detachable on mine so modifications should be easy.


    See boys and girls, "Craziness pays........."

    "It is easier to deceive people than it is to convince them that they have been deceived."

  • Side by Side:


    It's easy to see why FW gets the big bucks.


    Luteus is hopelessly out classed; Fah!


    Don't quit yer day job Blackadder.........

    "It is easier to deceive people than it is to convince them that they have been deceived."

    Einmal editiert, zuletzt von Blackadderz ()

  • Luteus Vexant Stands 160 feet (49 meters) tall.
    This is not a kit, everything is handmade from scratch fabricated from individual bits of styrene. There are well over 10,000 bits of plastic glued together some no bigger than the head of a pin. "Luteus Vexant" is the name I chose for the Warlord It in Latin means "Dirty Harry." The Titan has a full interior with five levels completely furnished and manned with a crew. I am still in the process of wiring the lighting and it needs more paint.


    http://i.imgur.com/NgEqa30.jpg

    "It is easier to deceive people than it is to convince them that they have been deceived."

  • Nickeled and Dimed:


    Another FW tease displaying tantalizing bitz and pieces of the forthcoming Warlord titan. No Hollywood starlet ever received better hype regardless of the size of her guns.


    You can tell by the painted areas that the titan is ready for display and FW is just milking this for all it's worth.


    Meanwhile since I already have a titan of sorts I can use these images to enhance the detail on my own construct...


    So there FW eat your hearts out; yours is only an attenuated Mars pattern also ran. Ha!


    Whom I kidding I've already mortgaged the abode to get one of these.

    "It is easier to deceive people than it is to convince them that they have been deceived."

  • The head came out today so it looks like a breach birth.......


    I'm pleased with the overall shape of the head but the size is a concern. Obviously there must be a 3 man cockpit crew so it has to be bigger than the Reaver head. The 'Face' is long rather than squat like the Reaver so I see a lot of the Dave Smith version and my own. In the FW tradition the cockpit helmet comes off to reveal the interior; I guess it's just a case of wait and see how the sizes compare. FW is sticking with the ball gimbal neck so the head won't be movable; that's disappointing but can be circumvented.

    "It is easier to deceive people than it is to convince them that they have been deceived."

  • Meh!


    I have to say after all the hype the debut poster is rather uninspired:


    The painting is pretty mediocre and the model looks like all the recent gangling Mars kniggets that FW has been offering.


    What a disappointment...............

    "It is easier to deceive people than it is to convince them that they have been deceived."